How to Clean Your Vacuum Cleaner and Filters

Every day you push your vacuum around the house and then shove it back into a dark cupboard when you’re done. We think it’s time to stop to consider what punishment that vacuum is getting, and what it’s doing to the performance.
If you think about the distance that poor thing gets dragged across, you would be staggered. Is it any wonder that eventually something malfunctions?
Modern vacuum cleaners are advanced pieces of kit, and manufacturers claim that their machines suffer no loss of suction.
But that claim is only accurate if you read and understand the warranty, and instruction manual, because in most, it’s there in black and white. You have to keep it regularly cleaned. Your warranty depends on it!
They maintain good suction if you maintain the machine. Simple really!
Simple diagnostics
Before we launch into how to clean your vacuum cleaner, we thought it would be a good idea to run through some simple diagnostics to help you target your clean to the areas most in need of some attention.
My Vacuum Cleaner Smells
More than likely, the cause of your vacuum smelling will be one of the issues below. Over time, vacuum cleaners can start to give off a bad odor, especially if you have pets, which is why giving them a thorough clean is a good idea.
The Brushroll is Jammed – Often, when the brushroll clogs with debris, it can cause the drive belt to heat up, which then causes it to emit a strong smell of burning rubber.
The Exhaust Vent is Blocked – Because a vacuum cleaner needs to expel the cleaner air from inside the machine to maintain suction, if the exhaust vent is dirty or blocked, then that can be the cause of bad smells.
The Dust Canister or Bag Needs Emptying – If the dirt canister is full, it typically forces any excess debris into the machine, causing it to release smells. Also, if you have a vacuum that has dust bags when these are full, they emit bad odors too.
Filters Need Cleaning – When the filters are dirty, they stop trapping pollutants and debris, and all that dust starts to emit a bad smell, especially if you have pets that shed hair..
My Vacuum Cleaner Won’t Suck
Check the Intake Port – The intake port is in the same location as the brushroll, so because of the amount of debris being kicked up by the rotating brush, especially if you have carpets or rugs, it is the most obvious place to look for a blockage.
The Dust Canister or Bag is Full – Once you fill the canister or bag with debris, there is nowhere else for any new dust to go. The vacuum cleaner starts to lose performance, and suction power fails.
Check the Filters – A functioning filter should trap pollutants and debris but allow clean air to pass through, but if they are full, that air cannot escape, which causes the vacuum to lose suction.
Check the Fan – Without an operational fan, there wouldn’t be any suction at all. It’s the fan that creates the pressure that gives your vacuum the suction power it needs. If it stops working, so does your machine.
While this is not a comprehensive list, the good news is that all of the above are simple things to resolve, but the best way to avoid anything like this happening is to maintain your vacuum cleaner and give it a regular clean.
So, What Are the First Steps?
Well, you will need some essential tools to complete the task and some cleaning agents like non-abrasive detergents. Find a clear space, like the dining table, throw over a cloth to prevent scratches, and lay the vacuum cleaner down. This gives you a dedicated workbench, which makes everything a lot easier.
The Tools You Will Need
A Crosshead Screwdriver – Most vacuum cleaners are held together with screws that require a crosshead screwdriver, and the screws are easy to remove.
A Brush – Get hold of a hand-held brush, like the sort you use to scoop debris into a dustpan. The brush is excellent at getting those stubborn pet hairs and bits of carpet fiber that gets trapped inside the contours of the dust canister..
A Bucket of Warm Water – This is to soak your filters after you have removed them.
Detergent – Use the non-abrasive type, with antimicrobial agents that are designed to disinfect and kill germs on the surface of your filters.
Compressed Air – A can of compressed air is fantastic at blasting away any stubborn blockages and ground in dirt.
Microfiber Cloth – Microfiber is effective at trapping in the tiniest specks of dust, removing far more than a standard cloth. They can absorb up to eight times their weight and are also very soft, to protect the surface of your vacuum cleaner.
A Pair of Scissors – Scissors will help you cut away the tangled fibers and hairs from the rotating brush.
A Toothbrush – For getting into those hard to reach places.
The Four Main Areas of Focus

1. Cleaning the Rotating Brush
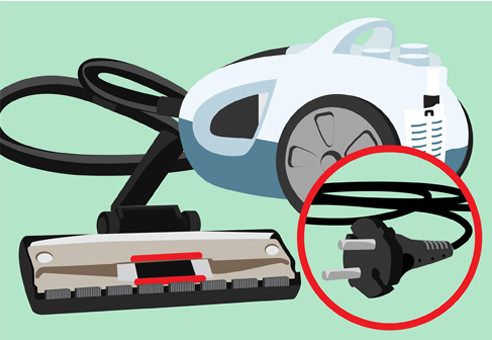
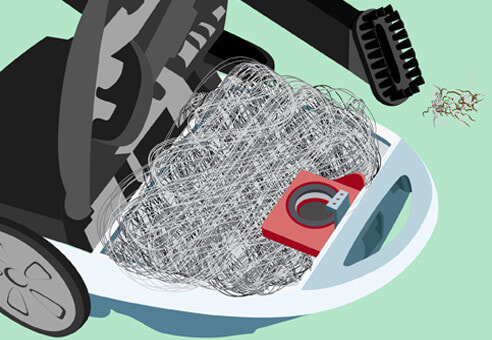
First, you have to make sure that the vacuum is unplugged. Once you’ve done this, lay the cleaner on its back to reveal the underside of the rotating brush. With a pair of scissors, try and snip away any tangled hairs or strands of fabric. Often, this is the cause of the vacuum not performing and the simplest way to remedy it.
If you still have debris wound around the brush, you may have to unscrew the housing plate and unhook the drive belt. This allows the rotating brush to unclip and be removed. By removing it, you stand a better chance of getting at all the blockages and tangled strands.
Once the rotating brush is clear of dirt, reverse the process of unclipping and place it back into the vacuum.
Make sure that you correctly attach the drive belt to the rotating brush or you’ll have further problems with performance.
When you are satisfied that all is as it should be, screw back the housing to lock everything in position. As one final check, roll the rotating brush in your hands to see if it moves freely and there aren’t any blockages.
Happy so far? Okay, let’s move onto:
2. Cleaning the Dust Canister
It is important that the canister remains as clean as possible, because this is the area where all that dust collects, and if not kept regularly maintained, dirt can spill into the machine.
It’s also a good idea to empty the canister regularly, say every other day, or indeed when you see the chamber at least half full. Again, if debris is left to gather in the canister, spillage can occur to other parts of the vacuum, ruining the performance.
To empty, simply tap the detached canister on the side of the bin until all the loose debris and hair falls away.
Try to clean the canister at least once a month. The brush will come in handy as it will remove any stubborn dust that has become ingrained in the contours of the canister. You can use a toothbrush to help get into hard to reach places.
Because the canister unclips from the main body of the machine, and now that it’s empty, it’s a wise move to wash the canister in warm soapy water. Use the non-abrasive detergent that we talked about earlier, and make sure that the canister is thoroughly dried and wiped with a microfiber cloth.
Important note: Never place the canister back in the machine when wet. Water and electrics don’t mix, and mold loves damp surfaces!


3. Cleaning the Foam Filter
Most modern vacuum cleaners have secondary filters, made from plastic. Once you’ve removed the dust canister and put it in a bowl of warm water to rinse, you can do the same with the filter.
Be careful, because some models have additional filters made from foam. Check to see if yours is such a model because most manufacturers don’t recommend washing the foam filter. It tends to perish, reducing its life. The best way to clean this filter is to tap it out into the trash in a well-ventilated area. When you’re satisfied that the foam is no longer stained with debris, place it to one side.
Depending on whether your model has two or three filters, slide them out one by one, and remember the order that you removed them. Get the order wrong putting them back, and the machine may not function.
Once removed, the plastic filter can be soaked in warm soapy water until all the staining and debris has been washed away.
When you are satisfied, squeeze any excess water away, and leave somewhere dry, preferably outside.
It’s vital that the filter is bone dry because you wouldn’t want mold spores, or mildew to grow on the filter, contaminating the surface of the vacuum cleaner. That negates the purpose of the filter in the first place, and it’s the last thing you want!
When you are sure that it is dry, place it back in the vacuum cleaner, along with the foam filter, in the same order you removed them, and clip the canister in place.
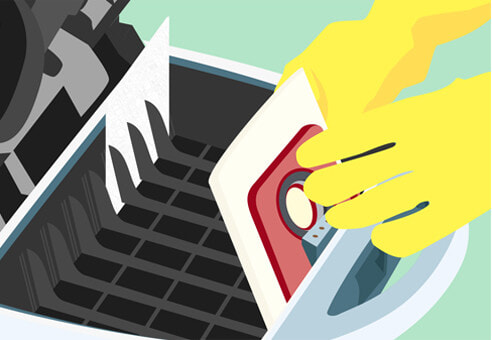
4. Cleaning the HEPA Filter
The HEPA filter is typically located at the base of the dirt canister, where it clicks into the machine. Carefully remove the HEPA filter and tap excess debris from the surface into the trash. Again, do this is a ventilated area. Your HEPA filter will be covered in contaminants, and there’s no point collecting them on the filter if you’re going to breathe them in when cleaning it.
Some models come with a replacement set of HEPA filters, so it’s a good idea, while you have the soiled filters out, to replace them with the new ones. If not, it is a good idea to buy some spares. This means you don’t have to wait for the old ones to dry, and you prolong the life of both sets of HEPA filters by rotating their use.
Now you’ll need to wash the HEPA filters in warm soapy water (again, a less abrasive detergent is preferred, like dishwasher soap), and make sure that you remove most of the staining from the surface of the filter.
Don’t worry if there is still some discoloration, that’s normal. After all, it’s sure to suffer some wear and tear!
Make sure that the HEPA filter has plenty of time to dry, as HEPA filters take a lot longer than foam filters. Mold and mildew won’t help the HEPA do its job, and may be the cause of poor quality air getting released via the exhaust port of the vacuum.
Because you’ve already replaced the HEPA filter with the spare one, when you are satisfied that the filter is clean and dry, store it somewhere appropriate, ready for when you do this all again in another month’s time.

Top Tips
Always make sure you have spares
Some manufacturers often supply spare HEPA filters with their machines, but they don’t provide all the spares you will need. Filters are prone to perishing, especially if you clean them regularly, so get some authorized spares and keep them in the cupboard. Do the same for the foam rubber filters too.
And talking of spares; keep a spare drive belt in the cupboard as well. Anything that’s perishable, you should think about keeping a spare.
Have a Safe Place to Store the Screws
We don’t think you’ll be too surprised to learn that one of the easiest errors to make is to lose the screws. And they are easily lost! Grab a cup or bowl, and place the loose screws inside, then put them somewhere safe, like on the countertop. Then, when you come to put the vacuum back together, you won’t be fishing around on the floor for discarded screws.
Clean Your Vacuum and Filters Once a Month
Regular cleaning of the vacuum is part of the manual, and the warranty could be invalid if it’s not maintained. That’s why we recommend doing it at least once a month. If you follow these simple steps, it should be enough to keep your vacuum working efficiently for years to come.
Clean the Vacuum When There Are No Distractions
While performing the cleaning task is relatively simple, getting distracted by children, or conversation can make it a whole lot more complicated. To avoid this, do it on a quiet day when you have no visitors, or the children are at school or otherwise occupied.
Use a Deodorizer
Once you have cleaned your filters and changed the dust bag, it would be advisable to buy a deodorizer to keep your machine smelling fresh for longer.
Final Thoughts
We live in a throwaway world, where the first sign of a malfunction causes us to reach for our smart device and shop for a replacement. That is bad for the planet and bad for your bank balance, with the only winners being the manufacturers.
Why not take some time to learn what each component of the vacuum does, and how to diagnose the problem? That way you will be better prepared to roll your sleeves up and get stuck in.
It is a sure-fire recipe for success, and that has to be good for the planet and your pocket.

