Common Issues with Vacuums and How to Fix Them
Our busy lives mean we’ve grown accustomed to things working efficiently, and vacuum cleaners are no exception. We love it when they work, but when they malfunction, it’s usually at the most inconvenient times: right before a dinner party, when you have an important guest coming, or when you’re in a hurry (which is always!).
If you find yourself with a vacuum cleaner that isn’t working correctly, you’ll need to know what to do. This article looks to some of the most common issues that vacuum owners can experience and offers advice as to how to fix them fast and get back to your cleaning routine. Let’s get started!
Common Issue #1: The Vacuum Cleaner Belt has Broken
A broken drive belt is by far one of the most common issues that vacuums can have. Belt wear is normal, especially as the belts are made from rubber and prone to elasticity problems. In fact, vacuum manufacturers term these items as perishable, so within the lifetime of your vacuum, you are supposed to perform this kind of maintenance as part of the overall running costs.
If you are maintaining your machine appropriately, you might spot that the belt is becoming stretched and maybe a bit worn. Tell-tale signs of a drive belt perishing are finding little flecks of rubber in the machine or spotting a trail of debris on the floor in the path of the vacuum. You might also hear the vacuum change in pitch, an indication that the rotating brush is not functioning properly. If you see such evidence, you might be able to spot the need for a replacement before the belt snaps.
The good news is that replacing this belt is easy. Just unplug the machine, lay it on its back and unscrew the housing that covers the brush. You’ll find the belt located on the end of the brush. If indeed it has snapped, you will be able to remove the brush without having to slide it away from the belt. Once the brush is removed, take out the broken belt, making a note of how it attached to the motor drive, remove any fragments that have sheared off, and hook on a replacement. Hook the new belt over the motor attachment and then the brush. Re-attach the cover, and you’re good to go. Click here, for a more detailed guide on how to replace your vacuum belt.
Common Issue #2: The Rotating Brush Doesn’t Spin
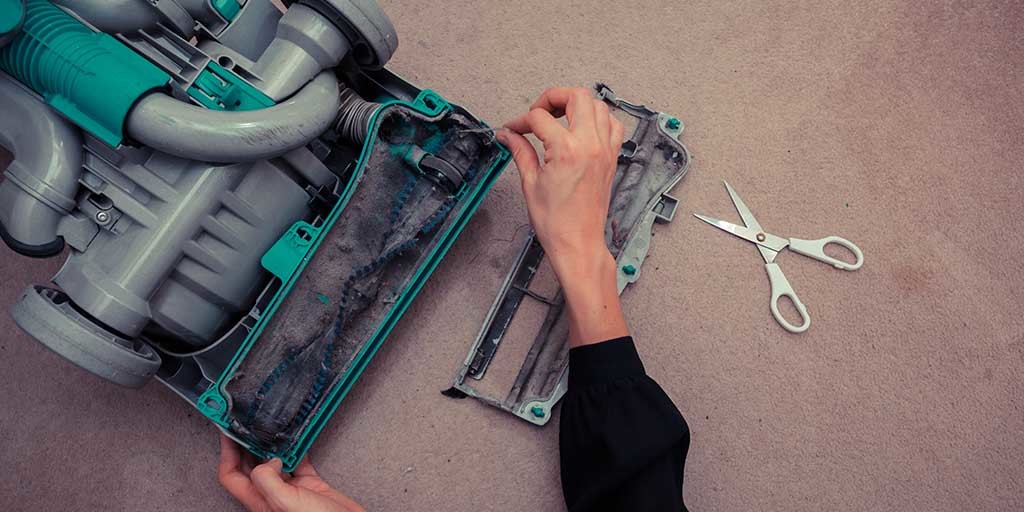
While you have the rotating brush uncoupled from the vacuum, it’s a good idea to check the actual brush for debris. Often, when a drive belt snaps, it is caused by something affecting the ability of the brush to spin. Common causes of a blocked rotating brush include tangled hair, pet hair, and carpet fiber strands.
Remove these with a pair of scissors, because if left, it could eventually put a strain on the motor of the vacuum, causing more severe problems later on. Once you’re satisfied that there aren’t any foreign objects on the brush, re-attach the belt and clip the brush back into place. Give the brush a final manual roll with your hand to see that there are no obstructions.
Common Issue #3: The Vacuum Cleaner Lacks Suction
Lack of suction is also a common fault with vacuum cleaners and is also luckily one of the easiest to remedy. First things first: is the dust canister full? You might scoff at this, but you’d be amazed at how many people overlook this simple task. You should empty a standard dust canister every other day, and indeed when the canister is half full. Never let the canister over-fill, because this forces the debris that you collect into the pipes and filters that can degrade the machine. The same prudence should apply to bagged vacuums as well.
If you’ve emptied your canister but still experience the problem, the next most common cause of a loss in suction is a dirty filter. Air has to flow through the filter for it to catch the contaminants. If the filter clogs with so much dirt that the air can’t flow, the suction of the machine becomes impaired.
Cleaning a filter is simple: Unclip the dust canister, and the filter sits at the bottom, where it clips back into the body of the machine. Most filters slide or clip out and can be washed in warm soapy water. Some vacuums have secondary filters, so again, if you’re cleaning the true HEPA or HEPA-type filter, it may be a good idea to look at the other filters too.
Proper maintenance can be an active ally to the long-term health of your appliance. So, make sure that you give the vacuum a decent clean every month that includes the filters. In addition, always make sure the filter is completely dry before inserting it back into the vacuum cleaner. You don’t want mold or mildew spores to grow on a damp filter, infecting the rest of the machine and making the air from the exhaust ports contaminated.
If your filters are squeaky clean but the low suction persists, a blockage in the hose could also be the cause. The good news is that this issue can also be easily remedied. Hoses are flexible, making it simple to locate and manipulate a blockage. One simple tip is to lay the hose in a straight line and shine a flashlight down the length. If no light escapes the other end, you most likely have a blockage. You can use a long thin implement, like a broom handle, to force the obstruction out.
A word of warning: If you have pets that shed a lot, then these common problems might be a more regular part of your vacuuming routine. It’s worth remembering that the vacuum will have to work harder in these environments, and so you will be required to give your vacuum cleaner tender love and care more frequently to ensure that these problems get nipped in the bud.
Common Issue #4: The Vacuum Cleaner Smells Bad
If you have a bagged vacuum cleaner, an odor is often emitted into the atmosphere as the bag fills. If you imagine that all that moving air is passing through the bag, the place where all the debris has been sitting for the last week, then that’s probably the reason for the odor.
If you have pets, again, odors aren’t uncommon from the vacuum.Bad smells could however also be a sign that you have mold or mildew growing in the machine. A common cause could be a filter was replaced while still damp. If that happens, you’ll have to replace the filter.
So how do you combat bad odors? Here are some time-tested ways to de-stink your vacuum:
- Add baking soda: Adding baking soda to the canister or bag should neutralize the bad smell.
- Add cinnamon: This leaves a sweet scent in the room. Other scented food items can be used, like coffee beans and dried fruit peel.
- Add scented pads: These pads sit above the filter delivering a gentle smell while the vacuum is on.
- Add a freshener to your carpet: Once sucked into the vacuum, it leaves the room smelling fresh and the machine too. The other advantage is that the new scent lingers for days.
Common Issue #5: The Vacuum has Overheated
When a vacuum overheats, it can be a sign of several potential problems. It might indicate that you’ve used your machine for too long, as many vacuums will overheat if used for prolonged periods. It might also indicate an issue with the type of flooring in your home, because the harder the vacuum works, the easier it is to overheat.
However, overheating could also be a sign that the motor is faulty. If that’s the case, we recommend that you take it to an authorized dealer to be checked out. But you should only do that once you’ve completed a few maintenance tasks first:
- Check if dust canister isn’t full: If the dust has nowhere to go, the machine has to work doubly hard to suck up the dirt, and your device becomes clogged.
- Check if the rotating brush is working: If the brush is tangled or blocked, that puts a strain on the motor, causing it to overheat.
- Check for blockages: If there is a blockage, the airflow is restricted, which means the machine will get hot. That can cause the vacuum to shut down.
- Check if the filters aren’t dirty: As we’ve mentioned, a dirty filter will restrict the flow through the vacuum, causing it to overheat.
Once you are satisfied that none of the above is the culprit, it’s time to consult the experts. If it turns out that the motor is dead, the vacuum cleaner might require some major surgery.
In these scenarios, the warranty conditions play a crucial role. If you haven’t maintained your vacuum cleaner in accordance with the warranty, you’ll probably be facing more than just the cost of repair or replacement parts; you might have to buy an entirely new machine. Follow your machine’s warranty and you’ll at least have the peace of mind that you’re potentially keeping the costs for future maintenance at a minimum.
Happy vacuuming!

